How I Combine Collage, Texture, and Oil Paint to Build Surfaces That Tell a Story
I am an oil painter and I love to include it where I can. I will share with you how I use oil paint in my mixed media art. When I paint, I almost never start on a white surface. It’s too sterile, and I waste paint trying to cover up the white spots. I like to tone the canvas first, usually with a thin acrylic wash in a color opposing the background or subject, just enough to take the edge off that blank white space, but sometimes I take it further. Some of my favorite paintings begin with collage. I work in a library, and I’ve always been drawn to the texture and color of old books. In 2015, I did an entire solo show called Book Studies, which combined book art, mixed media, and oil painting which was all as a tribute to my love of books and paper.


Book pages and sheet music add a vintage feel to an artwork. I have a collection of sheet music so old that if you fold it, it will break apart, but that brittle, aged paper still has beauty and comes in a range of shades from light beige to sepia. I have found a way to preserve this paper and give it a new life by including it in my work. This is an example of what happened to acidic paper over time. If you love the smell of old books, that is the smell of decaying paper. This is why I use high-quality acid-free products when working with old paper.
In this post, I’ll walk you through how I use oil paint in my mixed media art, how I prepare my surfaces for the oil paint on top of the mixed media elements so that they not only look good but actually last.
Choosing the Paper
The first step is finding the right paper for your surface. You might feel a twinge of guilt tearing a page out of a book, but don’t. In a library, hundreds of books are recycled or discarded every year. If they don’t end up donated, they often go straight to the free cart or recycling bin, though some public libraries have book sales for the public. I get most of my collage materials from the free cart at the library where I work.
The older the paper, the more character it brings. The texture, color, and typeface all become part of the painting’s atmosphere. I keep a stack of torn book pages and vintage sheet music in my studio, ready for the next piece.
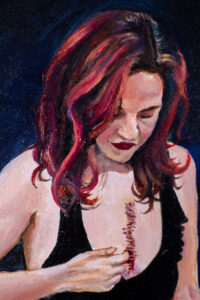
This process works beautifully when I live paint at music events. The sheet music background becomes part of the energy of the space. It’s thematic, and it frees me up to focus entirely on the subject instead of fussing with the background. The collection of sheet music I have is extremely brittle. If you try to bend or fold it, it breaks. However, it has a deep camel color that looks so good in my paintings. I have sold four pieces this year with the sheet music background. People love it!

Preparing the Glue
You don’t need anything fancy to attach the paper, but you do need something stable. My favorite adhesive is PVA glue (polyvinyl acetate). It’s archival, acid-free, and the same glue used in bookbinding, which makes it perfect for mixed media projects where you want the work to last.
If you don’t have PVA, Mod Podge, or even Elmer’s Glue will do if you have it on hand, but if you’re creating something you want to keep or sell, go for the archival option.
Here’s how I make it ready for collage:
- Mix the glue 1:1 with water.
- Stir it well, because you want it smooth and milky.
- Pour it into a jar with a lid; it’ll keep for weeks.
- If it thickens over time, just add a little more water and mix again.
This thinned glue mixture will soak into both the paper and the surface, forming a flexible bond that holds up beautifully once sealed with gesso.

Preparing the Surface
My surface of choice is a wood panel. It’s rigid, stable, and ideal for collage. You could use canvas, but I find panels handle glue and layering better.
Would I use one of our acrylic-primed linen panels for this? Probably not. I save those for my oil paintings when I want a clean, smooth surface. For mixed media, I start with plain gessoed wood.
The gesso protects the wood from moisture in the glue and gives the surface a little tooth for the paper to grab onto.
Here’s how I apply it:
- Tear your chosen paper into the size and shape you want. I prefer torn edges over cut ones; they blend better visually. Decide on the arrangement before gluing so you know how you want your collage to look.
- Brush the glue mixture over your panel where the first piece of paper will go. Work in sections if you plan to overlap papers, covering only the area for each piece as you go.
- Brush the back of the paper as well, then press it onto the surface.
- Load your brush with more of the glue mixture and use your brush to push out any air bubbles. Use generously because you want the paper to be fully saturated.
You can overlap layers if you like a little texture. When it dries, it becomes part of the structure of the surface.

Sketching the Image
Once the paper layer is dry, I lightly sketch my image directly on top. If I’m painting live at an event, I usually sketch ahead of time, but I have been known to skip the sketching and raw dog it when I am pressed for time. It was stressful, but it turned out fine and I sold that piece.
If you do sketch, use a light hand with a pencil. You can’t erase easily once you’ve glued paper down, and honestly, you don’t need to. A few faint lines are enough to guide your composition. But don’t fret, this is mixed media. It’s not supposed to look sterile. Pencil marks, wrinkles, and little imperfections give it character.
Priming the Surface
Now its time to seal it all up with some clear gesso. This will act as a transparent primer, protecting the paper while giving it enough texture for the oil paint to adhere.
If you want to protect your sketch, you can spray your drawing with a light coat of fixative to prevent smearing before you apply the gesso, but I usually don’t bother. It will be fine.
Brush on an even layer of clear gesso over the entire surface so every corner and seam is covered. Once it dries, run your hand across the surface to check for consistency. It should feel evenly gritty and slightly rough, never slick.
That tooth is what makes it hold oil paint beautifully.

Making the Art
At this stage, you’ve basically rebuilt your panel into a sealed, gessoed surface with a lot more personality. You can use almost any medium on top if you like, but once you commit to oil, stick with oil.
Always remember the rule: lean to fat. Start with thinner paint (cut with a little Gamsol) and build into thicker layers as you go. Hold off on adding any oils or mediums to the paint until the end of the process.
I usually begin by blocking in values, just the basic shapes and tones, and then let the underlying paper peek through in areas where I want a vintage or textural feel. The contrast between smooth paint and the paper beneath can be stunning. Many oil colors are transparent and can add interesting textures through the color.
Once you’re in the rhythm, the collage layer starts to feel less like a background and more like an atmosphere. It interacts with the paint. Sometimes I leave bits of text showing through; other times, I obscure them completely. I respond to the textures in the moment.
Why It Works
The oil paint on top adds depth and dimension that acrylics alone can’t match. The paper brings history and warmth. Together, they create something layered and tactile. It creates a surface that had a whole life before becoming a work of art. It has experience!
It’s also a great reminder that fine art doesn’t have to mean pristine materials. Sometimes the best ideas start with whatever’s at hand, such as a yellowed page from a forgotten book, a torn hymn, a scrap of old sheet music that breaks if you fold it.
Mixed media painting with oil gives you permission to be both resourceful and expressive. It’s structured enough to last, but free enough to surprise you. This is how I use oil paint in my mixed media art. If you have any additional tricks, feel free to share in the comments!